Mastering Smoked Pork Shoulder: Your Ultimate Low & Slow Guide
There are few culinary delights as universally loved and deeply satisfying as perfectly smoked pork shoulder. Imagine tender, succulent meat, infused with rich smoky flavor, effortlessly shredding into melt-in-your-mouth pulled pork. It's the centerpiece of countless cookouts, potlucks, and family gatherings, a dish that whispers of long summer days and genuine hospitality.
For many, the idea of achieving this pitmaster-worthy creation at home seems daunting. Visions of complex smokers, endless hours, and intimidating techniques might keep aspiring BBQ enthusiasts at bay. But what if we told you that mastering smoked pork shoulder is less about intricate secrets and more about patience, a few key tools, and understanding the "low and slow" philosophy? This comprehensive guide will empower you to transform a humble cut of meat into an unforgettable feast, complete with that coveted smoke ring and a bark to die for.
Why Smoked Pork Shoulder is a BBQ Champion
The allure of smoked pork shoulder extends beyond its incredible taste. It's a culinary workhorse that delivers on multiple fronts:
- A Crowd-Pleaser Extraordinaire: Once shredded, a single smoked pork shoulder yields a generous amount of meat, making it ideal for feeding a large gathering. From classic pulled pork sandwiches piled high on brioche buns to creative toppings for mac and cheese, baked potatoes, or even tacos, its versatility knows no bounds.
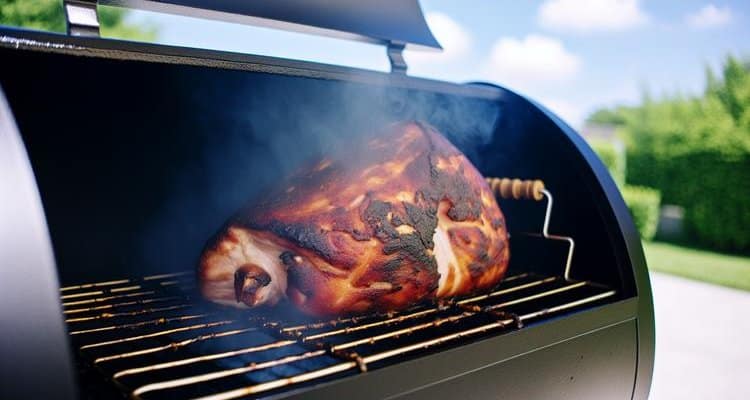
- Unmatched Flavor and Texture: The magic of low and slow smoking breaks down tough connective tissues, resulting in meat so tender it practically melts. This process also allows the smoky flavors to permeate deep into the muscle, creating a complex taste profile. The exterior develops a delightful "bark"—a dark, flavorful crust that adds textural contrast and an extra layer of peppery, savory goodness.
- Economical Indulgence: Compared to dining out at a BBQ restaurant, making your own smoked pork shoulder at home is significantly more cost-effective. You get a substantial portion of premium, delicious BBQ without the hefty price tag. Plus, leftovers freeze beautifully, allowing you to enjoy gourmet meals for weeks to come.
- Mostly Hands-Off: While the total cooking time is substantial (often 8-16 hours depending on size and conditions), the actual hands-on work involved is surprisingly minimal. Most of the process is letting the smoker do its job, freeing you up to enjoy your day while the magic unfolds.
Essential Gear for Smoked Pork Shoulder Success
You don't need a professional setup to smoke pork shoulder like a pro, but a few key pieces of equipment will make your journey smoother and more successful:
- A Reliable Smoker: Whether you opt for a pellet grill (like a Traeger, known for its ease of use), an offset smoker, an electric smoker, or even a basic charcoal grill setup for indirect heat, the goal is consistent, low temperatures and a steady supply of smoke. Pellet grills are particularly popular for beginners due to their set-it-and-forget-it temperature control. If you're using a Traeger, our article on Traeger Smoked Pork Shoulder: Easy Pulled Pork for Any BBQ offers tailored tips.
- Quality Meat Thermometer(s): This is arguably the most crucial tool. Forget relying solely on time; internal temperature is your true guide.
- Leave-in Probe Thermometer: Essential for monitoring the meat's internal temperature without repeatedly opening your smoker (which causes temperature fluctuations). Look for one with dual probes – one for the meat and one for the smoker's ambient temperature at grate level.
- Instant-Read Thermometer: Perfect for spot-checking different areas of the meat for even cooking and, most importantly, for testing probe tenderness towards the end of the cook.
You don't need to break the bank; a quality thermometer is an investment no more expensive than a large pizza, and it will prevent countless cooking mishaps.
- Heavy-Duty Aluminum Foil or Butcher Paper: Critical for the "wrap" stage (more on this later). Butcher paper allows for better bark development, while foil creates a steamy environment that tenderizes and speeds up cooking.
- Disposable Foil Pans: Great for catching drippings, holding the wrapped pork, and for the resting phase.
- Spray Bottle: Handy for spritzing the pork during the initial smoke, helping to keep it moist and promote bark formation. A mixture of apple cider vinegar, water, and a touch of apple juice is a popular choice.
The Low & Slow Process: Step-by-Step for Perfect Smoked Pork Shoulder
Let's dive into the core process of transforming a raw pork shoulder into a BBQ masterpiece.
1. Selecting and Preparing Your Pork Shoulder
- The Cut: What we commonly call "pork shoulder" for smoking is typically a "Boston Butt" or "Pork Butt." This cut actually comes from the upper part of the pig's front shoulder, not the rear. It's well-marbled and ideal for shredding. A "picnic roast" is the lower portion of the shoulder, often with skin on, and can also be smoked but yields a slightly different texture.
- Trimming: Pork shoulder doesn't require extensive trimming like a brisket. You want to leave a good fat cap (about 1/4 to 1/2 inch) as it insulates the meat and renders during cooking, adding flavor and moisture. Trim off any excessively thick or hard fat.
- Rub Application: Generously coat the pork shoulder with your favorite dry rub. Don't be shy – the bark is where a lot of flavor lives! For best results, apply the rub 8-12 hours (or even up to 24 hours) before smoking and refrigerate uncovered. This allows the rub to penetrate and dry out the surface, promoting a better bark.
2. The Initial Smoke Phase
- Preheat Your Smoker: Aim for a consistent temperature between 225°F and 275°F. Consistency is key. Load your smoker with your preferred wood (hickory, oak, apple, or cherry are excellent choices for pork).
- Placement: Place the seasoned pork shoulder directly on the smoker grates, fat cap up. Insert your leave-in probe thermometer into the thickest part of the meat, avoiding any large fat pockets or bones.
- Smoke & Spritz: Let the pork smoke, maintaining your chosen temperature. For the first few hours (often 3-5 hours, or until the bark is set), avoid opening the smoker too frequently. Once the bark starts to form and darken, you can begin spritzing the pork every 30-60 minutes to keep the surface moist and encourage more smoke adhesion.
3. Navigating the Stall
As your smoked pork shoulder cooks, you'll reach a point where the internal temperature seems to stop rising, sometimes for hours. This is known as "the stall," and it's perfectly normal!
- What Causes It: The stall occurs due to evaporative cooling. As moisture evaporates from the surface of the meat, it cools the meat down, similar to how sweat cools our bodies. Simultaneously, collagen within the meat is breaking down, another energy-consuming process that slows temperature rise.
- Patience is Key: Do not panic and crank up the heat! This will dry out your pork. Simply trust the process and keep smoking. The temperature will eventually push through.
- To Wrap or Not to Wrap: This is where preferences diverge. Wrapping the pork shoulder (often referred to as the "Texas Crutch") once it hits an internal temperature of around 165-175°F is a common technique to push through the stall faster. It also helps retain moisture. Our detailed guide on Beat The Stall: Secrets For Perfectly Juicy Smoked Pork Shoulder provides more in-depth strategies for this critical phase.
4. The Wrap & Finish
- Wrapping Materials:
- Butcher Paper: Allows some breathability, which helps preserve the bark while still aiding moisture retention and pushing through the stall.
- Aluminum Foil: Creates a tighter seal, trapping all moisture and steaming the meat, leading to extremely tender results but potentially softening the bark more.
Wrap the pork tightly, adding a splash of apple juice, broth, or cider vinegar to the foil packet for extra moisture if desired.
- Back in the Smoker: Return the wrapped pork to the smoker. Continue cooking until the internal temperature reaches between 200°F and 205°F. More importantly, test for probe tenderness: when you insert your instant-read thermometer or a skewer, it should slide in with very little resistance, feeling like it's going into warm butter. This indicates the collagen has fully broken down.
5. The Crucial Rest
This step is non-negotiable for juicy, tender pulled pork.
- Why it's Important: When meat cooks, its muscle fibers tighten, pushing moisture to the center. Resting allows these fibers to relax and reabsorb those juices, resulting in a significantly more tender and flavorful product.
- How to Rest: Once the pork is done and probe tender, remove it from the smoker (still wrapped). You can place it in a dry cooler or wrap it in a towel and then place it in a cooler. Let it rest for at least 1-2 hours, but often 3-4 hours is even better.
Tips for Achieving Pitmaster-Level Smoked Pork Shoulder
- Trust Your Thermometer, Not the Clock: Every piece of meat is different. Smoker variations, outside temperature, and wind can all affect cook times. Always rely on internal temperature and probe tenderness over a strict time guideline.
- Wood Selection Matters: Experiment with different woods. Hickory is classic for pork, providing a strong, savory smoke. Apple and cherry offer a milder, slightly sweeter, fruity smoke. Oak is a good all-around choice.
- Develop Your Bark: If you desire a robust bark, ensure your rub has plenty of coarse pepper and sugar (which caramelizes). Don't wrap too early, allowing the meat sufficient time to form a solid crust before steaming it.
- Don't Be Afraid to Experiment: The beauty of BBQ is that there are many paths to deliciousness. Adjust your rub, spritz liquid, wood choice, and even target temperatures slightly to find what works best for your smoker and your taste buds.
- Freezing Leftovers: Smoked pork shoulder makes fantastic leftovers. Shred the meat, let it cool, then portion it into freezer bags. Press out as much air as possible and freeze flat. Thaw in the refrigerator and reheat gently with a splash of apple juice or broth to retain moisture.
Conclusion
Smoking a pork shoulder is more than just cooking; it's an experience, a journey of patience and reward. While the process demands time, the hands-off nature and the ultimate payoff—a mountain of incredibly flavorful, melt-in-your-mouth pulled pork—make it an endeavor well worth undertaking. Armed with a reliable thermometer, a bit of patience, and these tried-and-true techniques, you'll soon be confidently creating pitmaster-worthy smoked pork shoulder right in your own backyard. So fire up that smoker, embrace the low and slow philosophy, and prepare to delight your family and friends with some of the best BBQ they've ever tasted.
